Web-to-Case is a feature within Salesforce’s Service Cloud that enables you to automatically create new cases via an HTML form, which can be seamlessly embedded into any webpage.
We covered web-to-lead ↗ in a previous post. Web-to-case is technically similar but has a few more gotchas. In this post I will run you through creating and implementing a web-to-case form (with reCaptcha), improving the form functionality and styling, and talk about ways to accept file attachments.
- Enabling web-to-case
- Generating the web-to-case form
- How cases appear in SF
- Validation and styling
- File attachments
- Common questions
Enabling web-to-case
Before you create a web-to-case form you first have to enable this functionality in Salesforce. This is one small way web-to-case is different from web-to-lead, since the latter doesn’t require such configuration.
From Setup, enter Web-to-Case in the Quick Find box, then select Web-to-Case.
On this screen you would first select the default user assigned to cases created. Once that is done you would see the configuration page with some options:
- Enable Web-to-Case: Check this option. Required. Without this new cases won’t be created and you will get error emails form Salesforce .
- Require reCAPTCHA Verification: Check this. Recommended, but not required.
- Default Case Origin: Chose an origin, like Web. Recommended.
- Default Response Template: The visitor who created the case will receive an email notification based on this template. Choose a template that is marked Available for Use.
- Hide Record Information: Relates to debugging. Skip.
- Email Signature: Relates to debugging. Skip. Note: you can also create and edit assignment rules under Setup → Case Assignment Rules.
Generating the web-to-case form
Quick technical note: Salesforce’s web-to-case tools generate an HTML form, which you can paste on your website. The generated HTML has an endpoint - this endpoint is where the entered information is sent. Salesforce receives the information at this endpoint and does it’s magic.
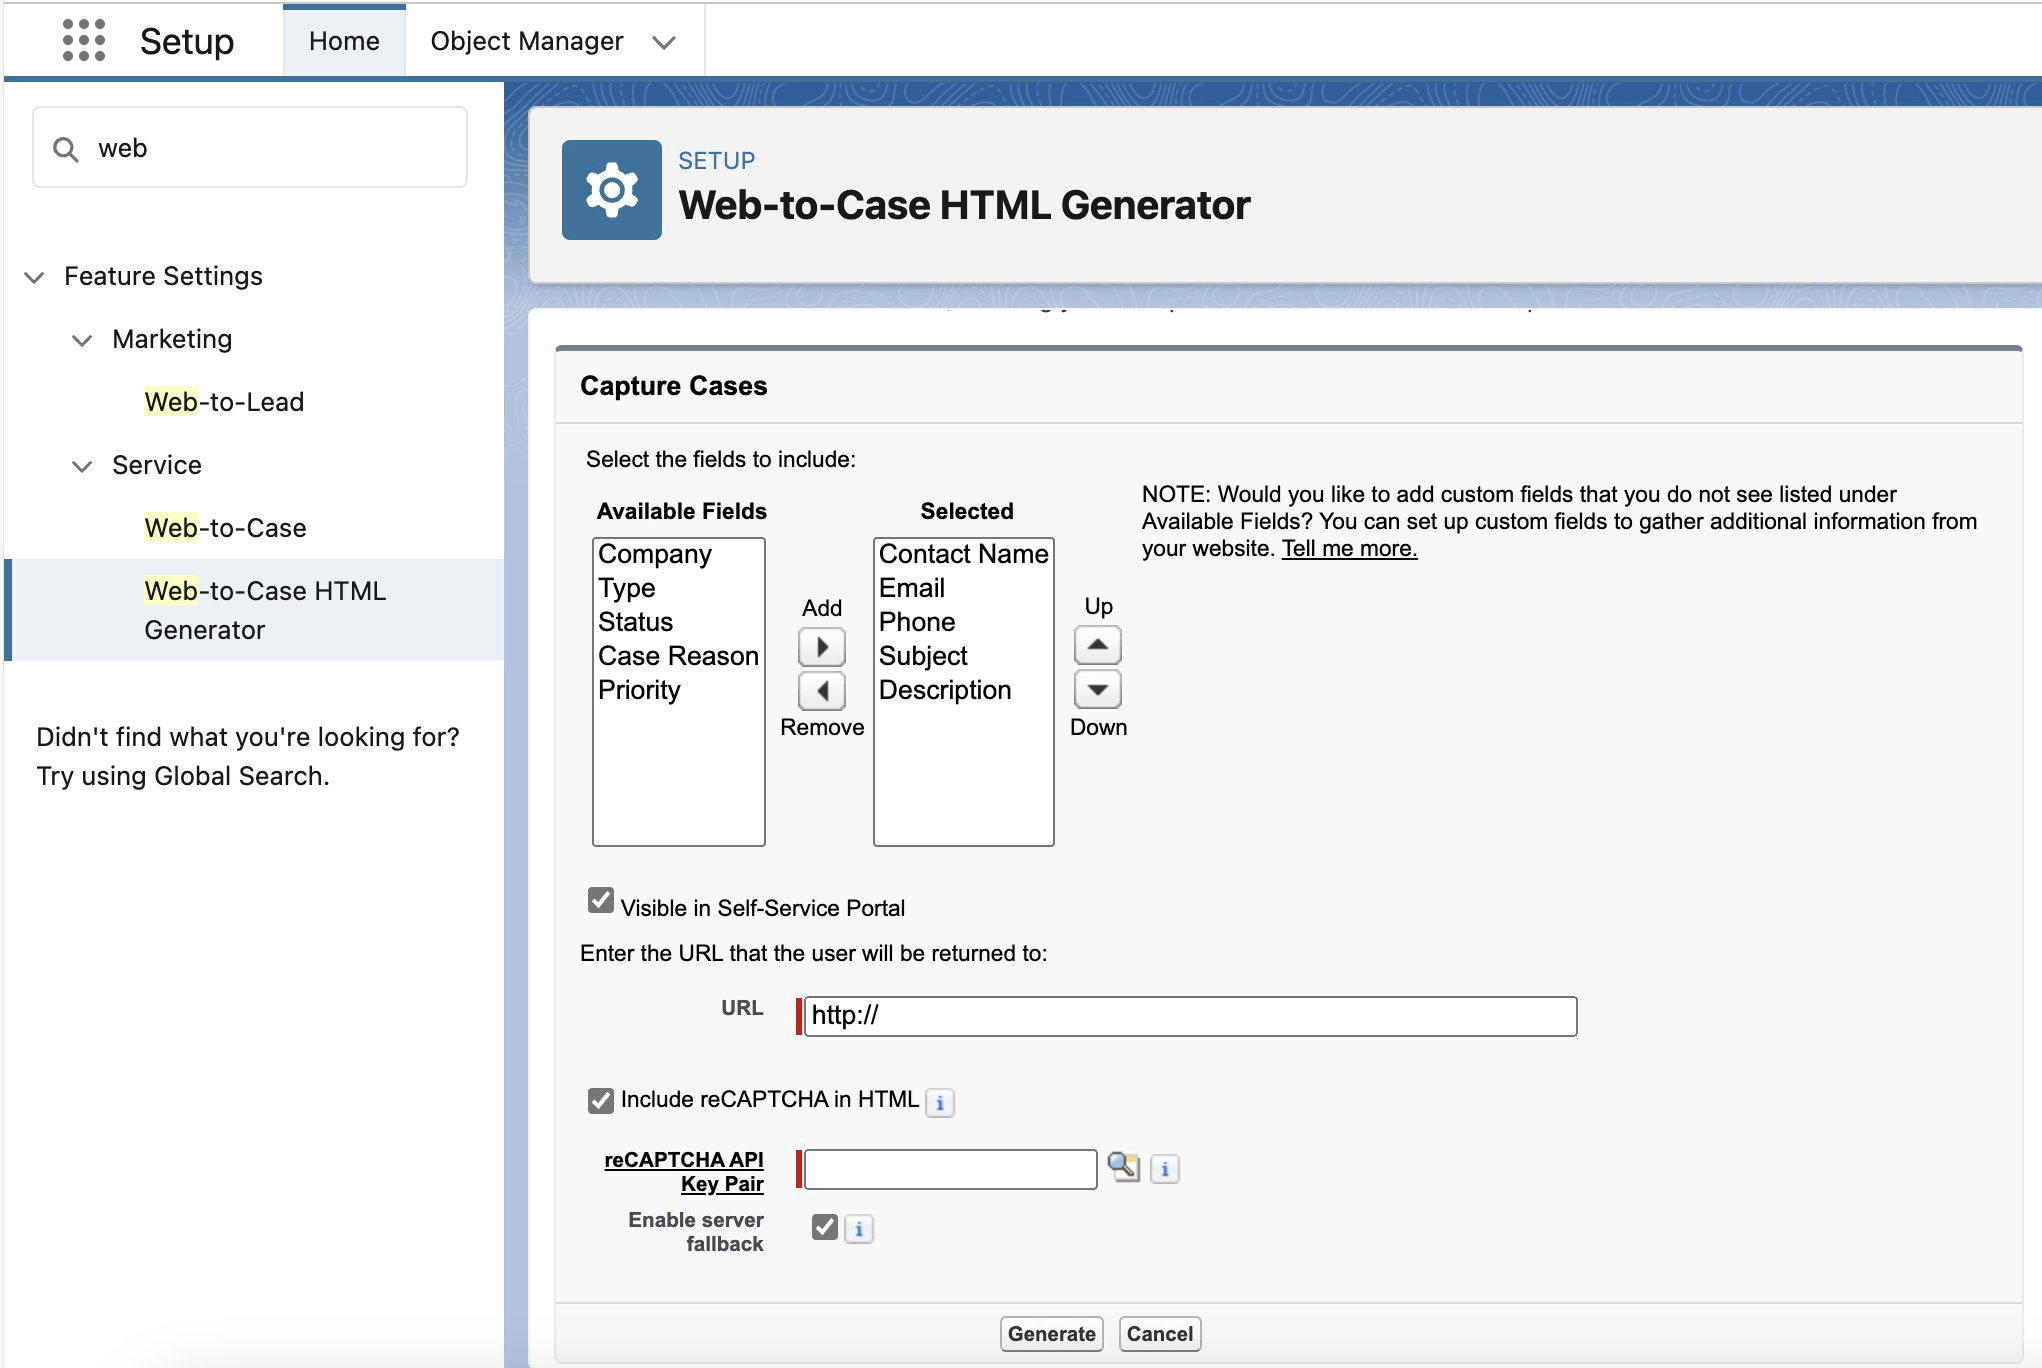
To generate a web-to-case form, look for Web-to-Case HTML Generator page in the Quick Find box. On this page you can choose which fields you’d like on your form. This page offers two more settings:
- URL: Once the visitor submits the form, they are redirected to a URL. This is where you specify that URL. In general we recommend that this page includes an acknowledgement, telling the user that their enquiry was received.
- reCAPTCHA API Key Pair: Your reCaptcha key. Highly recommended. Click on Generate to get the HTML of your form. This will take you to a screen like this:
What you see here is an HTML code. HTML is the markup language that powers the web. Let’s clean up the code a bit. You can remove everything before <form, which would be the lines with <!-- and then the <META line as well. Also remove the <!-- lines that are after the <form tag.
Your form would now look like this:
<form action="https://webto.salesforce.com/servlet/servlet.WebToCase?encoding=UTF-8&orgId=00A1A000001AAaa" method="POST">
 <input type=hidden name="orgid" value="00A1A000001AAaa">
 <input type=hidden name="retURL" value="http://">
 <label for="name">Contact Name</label>
 <input  id="name" maxlength="80" name="name" size="20" type="text" /><br>
 <label for="email">Email</label>
 <input  id="email" maxlength="80" name="email" size="20" type="text" /><br>
 <label for="phone">Phone</label>
 <input  id="phone" maxlength="40" name="phone" size="20" type="text" /><br>
 <label for="subject">Subject</label><input  id="subject" maxlength="80" name="subject" size="20" type="text" /><br>
 <label for="description">Description</label><textarea name="description"></textarea><br><input type="submit" name="submit">
</form>
Much better. Each <input> makes up a form field. The <label> makes up the text associated with the field. You can make changes to this form - Salesforce doesn’t care about the HTML of the form or what it looks like, as long as it receives the data in the expected format.
The form looks pretty … bad right now. We will deal with that later. First let’s get it working.
How cases appear in SF
Embed the HTML code on your website, and submit the form. The UX of the form isn’t quite ideal. Our form won’t show a loading button. Our redirect URL should include a thank you message - without that the user is left wondering if their enquiry was submitted.
Nevertheless, it works:
How does this case look in Salesforce?

The information entered on the form shows up under Additional Information. Salesforce will also populate the Contact Name and Contact Email fields if the email entered in the case form matches an existing contact email. If not, these fields will show up as blank.
Validation and styling
Our form currently has two main issues:
- It looks dull
- The fields don’t have validation. Visitors can submit the form with empty values, or invalid values (like an invalid email)
Look for <form in your HTML code, and replace it with <form class="case-form__styled". Now add these lines, right before <form:
<style>
 .case-form__styled {max-width: 360px;}
 .case-form__styled label {display: block;margin-top: 10px;}
 .case-form__styled input[type="text"], .case-form__styled select, .case-form__styled textarea {border: 1px solid #ddd;border-radius: 4px;padding: 6px 10px; width: 100%;}
 .case-form__styled input[type="submit"] {background: #333;color: white;border-radius: 4px;padding: 5px 16px;margin-top: 12px;font: inherit;}
</style>
Next, let’s make the form functionally better. Let’s make the name, email, and description fields required. We can do this by adding a required attribute to the field.
Example, our name field goes from this:
<input id="name" maxlength="80" name="name" size="20" type="text" />To this:
<input required id="name" maxlength="80" name="name" size="20" type="text" />Visitors can enter invalid emails in the email field and submit the form. When that happens you will get an error email from Salesforce, “There is an issue with This Case”. To prevent such scenarios we can add email validation to our form to ensure the field only accepts valid emails. Change the email field from this:
<input required id="email" maxlength="80" name="email" size="20" type="text" />To this:
<input required id="email" maxlength="80" name="email" size="20" type="email" />Sadly, we can’t do much about the phone field.
With the CSS and validations in place your form now looks like this:

File attachments
Let’s talk about the elephant in the room. Your visitors would often want to upload files with their case. There is no simple way to do it.
Allowing file uploads on the web-to-case forms is the 8th most upvoted open idea ↗ on the IdeaExchange. The official reply from Salesforce all but confirms that it won’t be coming soon.
Let’s look at some alternatives:
Using Formcrafts
This is the solution with an ideal UX, and a fairly low time to implement. Also, unlike other options below it does not require technical Salesforce knowledge. How? Just use this create case template. It has all the features of web-to-case form, along with other benefits:
- Creates a new case
- Finds and associates the case with an existing contact
- Marks some fields as required
- Has built-in validation for email and phone field, including country-level formatting
- Can be embedded on any website
All of this without touching HTML.
Share file links
Instead of allowing file uploads, ask your visitors to share a link to the file. In the description section you can also recommend a service or website they can use to upload files. Some examples would include WeTransfer, or Dropbox.
This makes your visitor’s job a little difficult, but this solution requires no technical expertise on your end, and would work with large files, and even multiple files.
Salesforce Sites or Public Flows
The best thing about Salesforce is the flexibility that comes with it. There are many ways to create cases that include file attachments like Salesforce Sites, or custom flows. I wouldn’t go into details here since these solutions require time and resources to implement.
Common questions
Case I allow users to update or view their case status?
That is not possible. Web-to-case will push data to Salesforce. It cannot read, or prefill any data. If you want prefill or update case functionality, try Formcrafts.
Where does the HTML code go on my website?
The answer depends on your website setup. If you’re using WordPress, you would add an HTML Block to your page and insert the HTML code there. For other CMS platforms, look for a similar feature – it might be called an HTML block or simply code.
Do I need reCaptcha? If yes, how do I configure it?
You absolutely do.
Firstly, enable the form to always use reCaptcha:
- From Setup, enter Web-to-Case in the Quick Find box, then select Web-to-Case.
- Select Require reCAPTCHA Verification and save your changes.
To add reCAPTCHA to your Web-to-Case form:
- Go to the Google reCAPTCHA website ↗ and sign up. Note that Web-to-Case only supports reCAPTCHA v2. So, v3 won’t work.
- Click “Get reCAPTCHA” to register your domain and obtain a public and private key pair.
- Now, go back to the Generating the web-to-case form step, and use the reCAPTCHA API Key Pair option to set and use the key pair.
What are the limits associated with web-to-case forms?
You can capture up to 5,000 cases within a 24-hour period. If you hit this limit, any extra requests are placed in a pending request queue, shared with Web-to-Lead requests. The default case owner listed in Support Settings will receive an email with details about the extra cases, and the requests are processed once the limit resets. If a new case can’t be created due to setup errors, Customer Support is notified to help resolve the issue.
The pending request queue can hold up to 50,000 requests. If this limit is reached, new requests are rejected, and the administrator will get email notifications for the first five rejected submissions.
Summary
Web-to-Case is a simple implementation that uses existing web technologies. It offers a simple functionality, and works well if your needs are very humble. The lack of good validation, form customization, file attachments would prevent serious use-cases.
We recommend Formcrafts’ Salesforce forms ↗ where additional functionality is required. It offer a high level of customization, without technical knowledge requirements.